Guide to Full Disk Encryption with Ubuntu
Updated June 28, 2015.
Here is a complete guide to full disk encryption using Cryptsetup, dm_crypt and LUKS, allowing you to tailor the encryption settings to your specification. The title says Ubuntu and the walkthrough happens in Mint but the instructions should generally apply to any distro which gives you either a live session or a shell where you can get root access to Cryptsetup.
Why bother with this, you may be wondering. The installer can do it, right? Well, yes and no. Let’s review the options for block device encryption in Ubuntu and what they do and don’t do. At the end, you can decide for yourself. For the condensed version of this with just the necessary steps and nothing else, see here.
The Choice Too Good Not to Make
Ubuntu’s installer is called Ubiquity and for 14.04 it received a single checkbox option for totally automated full disk encryption. You can liken this to the ‘use whole disk and do encrypted lvm’ setting on some other installers, and it really can’t get any easier than this. An added bonus is that there’s no post-install headache trying to get swap and hibernate working together.
This setting uses Cryptsetup’s defaults with LUKS for AES in XTS_plain64 mode, a 256 bit key with SHA1 password hashing run through 1 second of PBKDF2, so the amount of iterations depends on your CPU strength. System (/ or ‘root’), home and swap areas are all tucked into one encrypted logical volume. The boot partition must be separate in Linux FDE, no matter which configuration or distro and for most, it must also be unencrypted (exceptions: Arch and Gentoo) so /boot is open to attackers with physical access to the computer. Ubiquity makes an ext2 boot partition around 250 MB in size.
If you’re looking to keep your data safe from casual theft, this is perfectly fine, some would likely even argue overkill. On the contrary, I strongly suggest that this is the point any portable device should start at because it’s so easy to do, it would be irresponsible not to.
Students, this wonderful checkbox is definitely for you. American HIPAA requirements? This obliges. Unless your BYOD policy actually specifies encryption and hashing algorithms, default Cryptsetup fits that too. If you need the highest level security possible to safeguard against corporate and government espionage but your decryption key is your cat’s name, magic default setting still has you covered…sorta.
But There’s a Catch
The biggest problem with Ubiquity’s automation is the absence of all control which ultimately means you can not dual boot with it, not even with other Linux distros. You can either reformat the entire drive and install only the encrypted Linux, or you can install alongside Windows or whatever else—unencrypted.
Other negatives are relatively trivial, some not. Your drive’s partition table must be MBR format and while the installer does this for you, GPT is out of the question. You’re also stuck with logical volumes (hence, needing MBR) which does increase convenience, but at the expense of complexity and overhead. A consequence of logical volumes and MBR is that if your computer has UEFI, the distro will be installed in legacy BIOS mode so you can’t use Secure Boot. This setting also gives you a swap size equal to that of your system RAM (often unnecessary) and you have no choice over what kind of encryption is used.
Yet configuration downsides are expected because this super easy encryption option is meant to be a safe One-Size-for-Everyone choice. I’d say that, with the exception of not being able to use Secure Boot, these points would only be negatives to either more advanced users or different threat models, situations which both call for custom partitioning anyway.
How About GParted?
From Ubuntu 12.10, Ubiquity let you to specify a partition layout manually and turn them into encrypted volumes using GParted. You arrive there after choosing Something else in the Installation Type menu and you can find a walkthrough of that process here.
Why bother with manual setup? Because you can forgo MBR partition tables (in certain cases) and logical volumes to slice up your filesystem into as many partitions on as many devices as you want. The easy ‘just install and don’t ask me questions’ option won’t know where your SSD system drive is or your RAID storage, but with GParted you can configure everything accordingly. If you want / and /home on separate partitions, you use GParted. Want /boot on a USB stick or SD card to protect from those evil maids? GParted. All this still gives you a working swap and hibernate from the start.

Yet even this lacks flexibility. You’re still confined to Cryptsetup’s defaults so while you have great control over what’s to be encrypted, you have no say about the cryptographic primitives used. For that, you need to unbolt the training wheels and risk moments of great peril. In the end, you will have conquered the big bad terminal, and history shows that such noble effort does not go unrewarded.
Custom Spec Full Disk Encryption
If the goal is to configure Cryptsetup with the settings you choose, this is currently the only way to do it. Even the alternate installers only let you select from three encryption ciphers and their key size while there are more Cryptsetup options available when calling from the command line. Some may say that this is more work than it’s worth if you’re simply trying to keep stolen data safe from casual theft. Sure, I can see that point but if your computer gets stolen, you usually don’t know who did the deed and you will have zero certainty about what will be done with it.
Passwords are nearly always the weakest link. As hardware gets more powerful and new vulnerabilities are discovered, password cracking or other means of entry in such an occasion becomes a lot more viable. Yes, the attacker has unrestricted physical access to the device which helps enormously, but you can at least try to make it as difficult to break in as possible. You need a strong (read: high entropy) decryption password—it all starts with this. Next is the key derivation function.
Cryptsetup processes your password using HMAC-SHA1 with PBKDF2 and a salt. While using SHA1 in this manner is not (publicly) known to be broken, there are options available with stronger digest outputs. On the other hand, maybe you’re on a netbook where 1 second of PBKDF2 won’t get you much, so you want to increase the iteration time. These, along with foregoing the use of LUKS altogether, would be the main reasons to do a completely manual FDE setup. Yet regardless of your reasons, disk or partition cloning in your backup strategy would ensure that an esoteric installation need only be a one-time event. You decide.
Installation notes.
- These instructions give you an encrypted swap with working hibernation. If you don’t want a swap partition, skip where it’s mentioned but know that when the computer is sleeping, your decryption key(s) will be stored in RAM as plaintext.
- This walkthrough is on a computer with BIOS but instructions for UEFI are given where necessary.
- Logical volumes are not used, meaning you won’t be able to resize these partitions. If you do want LVM support, Ubunutu’s LVM wiki page will get you started in the right direction. You would add them in after you’ve created the LUKS volumes below, but before creating a filesystem inside.
- Where you see locations in red, you need to specify your preference or something specific to your system. So /dev/sda2, /home/username/, etc.
- Cryptsetup’s FAQ recommends only using the 95 printable characters from the first 128 characters of the ASCII table for LUKS passwords. See “PASSPHRASE CHARACTER SET” in the FAQ link.
- Run cryptsetup benchmark in a terminal to do a quick performance test of different encryption and hashing algorithms on your system.
- Kickass encryption is greatly diluted—if not totally broken—when you use dictionary words as decryption keys…
- but, obligatory xkcd comic.
- Last but not least:
This process will completely destroy all data on the designated drives or partitions. Back up your personal and config files before going further.
Step 1 – Prepare Noise Fill
You ideally want to fill the hard drive with nonsense data so that your encrypted block devices are indistinguishable from free space. If you’re starting with a blank drive, do the whole thing, even if you plan to install other operating systems. If you want to preserve other systems already installed, then only fill the partitions you plan to encrypt.
You have two options to do this. Sourcing /dev/urandom is commonly suggested for filling and gives you a background of random data. The downside is that it is extremely slow, writing in the area of 10-20 MB per second even on platter drives with 4K sectors. That can work out to a day or more for the operation to complete on a single drive.
Another point is that random data and encrypted data are not the same and in this scenario, sourcing such high quality entropy (well, as quality as a default system can get) is very unnecessary. You’re not generating encryption keys with this, you’re only masking where encrypted data is on the hard drive.
The second and less common option uses /dev/urandom, /dev/zero and OpenSSL to fill with an AES encrypted data stream at your drive’s normal write speed. This can still take a while for large drives, but is naturally a fraction of what’s needed for urandom. This method is especially appropriate if you choose AES for your encrypted partitions because then you’re hiding AES ciphertext in, wait for it…AES ciphertext!
There are no security implications with one method over the other because filler data has no impact on the encrypted partitions’ integrity or the encrypted data inside. OpenSSL can’t do other block ciphers in counter mode though, so AES it is, but this isn’t a concern because, again to drive the point home, you’re only writing noise to the storage device.
The command below creates a 128 byte encryption key seeded from urandom. /dev/zero is used to fill the drive but AES-256 in CTR mode is used to encrypt /dev/zero’s output with the urandom key before anything is written to disk. The result is a device filled with AES ciphertext. You’ll want a root terminal for this or use sudo -i.
openssl enc -aes-256-ctr -pass pass:"$(dd if=/dev/urandom bs=128 count=1 2>/dev/null | base64)" -nosalt < /dev/zero > /dev/sdxy
If you prefer to fill with urandom, it’s your choice. Here’s that familiar dd command. If you’re worried about urandom eventually depleting and then looping its entropy pool, don’t be.
sudo dd if=/dev/urandom of=/dev/sdxy bs=4096
To fill, you can either attach the drive to an already installed system by USB/SATA/etc. and work from there, or boot into live session. For either method, you’ll know it’s nearly completed when it warns ‘no space left on device’.
Step 2 – Basic Partitioning
Partition Tables
Now we’ll make the empty partitions which will later be converted into encrypted volumes. Boot your installation media into the live session, then launch GParted from the Dash or panel menu (you want real GParted, not what Ubiquity gives you). The first order of business is the partition table.
Partition table notes.
- When you set a partition table format, it’s for the entire hard drive, not each partition individually.
- MBR (master boot record) = “msdos” in GParted/Parted.
- You should use GPT (GUID partition table) unless you are dual booting with Windows below version 8. When booting older Windows, you need MBR.
- Extenal media can all use GPT unless that media is to be used by 32-bit Windows XP, then you must use MBR.
- If you have UEFI but your distro was installed in Legacy BIOS mode, you’re likely using MBR format.
- If all this is new to you, you likely have MBR.
- To see which partition table format your disks are currently using, run sudo parted –list.
- Use this command to determine if your current installation is in Legacy BIOS or UEFI mode:
[ -d /sys/firmware/efi ] && echo "Installed in EFI mode" || echo "Installed in Legacy mode"
In GParted, you set the partition table by going to Device -> Create Partition Table and selecting which format you want from the menu.
Boot Area
With FDE, you need the kernel and the initial ramdisk (initrd) on their own unencrypted partition since the system partition (where they normally live) will be encrypted. This is usually just referred to as the “boot partition”, with /boot specified as the mount point. 250 MB in size is a good safety zone with enough space to hold the initrd and 3 kernel versions which should suffice for more than most uses. You can go larger or smaller if you want (some people suggest 1+ GB so you can keep an entire backup .iso image there) but don’t go below 150 MB or you’ll have no space at all for kernel upgrades.
If you’re installing onto a computer with UEFI, the boot partition is technically called the EFI System Partition. It must be a FAT filesystem so choose FAT32. If you’re installing for legacy BIOS, make /boot ext2. Don’t use ext 3 or 4, or btrfs or anything with journaling. Sure, you can, but /boot is used only for a small duration when booting the computer and then during kernel upgrades. Filesystem journaling has very little benefit here and the journal uses 30 MB just for itself, so that’s either 30 MB less for everything else on the partition or 30 MB to increase its size by. Unnecessary.
Other than that, you can create system, home and swap partitions in whatever size or filesystem type you want. If you want to label each partition, here is the place to do it. If you use hibernate with a mechanical hard disk, you should put swap before home so it’s on a faster section of the disk platter.
Step 3 – Cryptsetup
Here is where you create the encrypted volumes and set them to use whichever cipher, mode, key size and hashing algorithm you choose. You can increase the PBKDF2 duration or even forgo LUKS altogether to use plain dm_crypt. Chances are that if you’re going through all this rather than just using Ubiquity, you already have something in mind. If you don’t, you’re likely fine with the command below which represents a healthy step up from default Cryptsetup settings in cipher and strengths, and the amount of PBKDF2 rounds. The tradeoff is slightly more time needed to decrypt for each partition compared to the defaults.
Notice the key size says 512, this is because of how XTS mode works. Half of the key space is for the key itself and the other half used by the cipher mode so this results in a 256 bit key. If you want a 128 bit key in XTS mode with any cipher, you would set the key size to 256. Other cipher modes don’t need this exception.
Open a root terminal or sudo -i again. Since we have root, swap and home to encrypt, run luksFormat once for each partition.
cryptsetup luksFormat --cipher twofish-xts-plain64 --key-size 512 --hash sha512 --iter-time 2000 /dev/sdxy
Note: If you want to use Whirlpool as a hashing algo instead of a SHA, first see section 8.3 of cryptsetup’s FAQ about compatibility breakage between newer versions of cryptsetup and older LUKS containers created with Whirlpool.
Now that you have encrypted volumes, open and name them root, swap and home (or whatever you want).
cryptsetup luksOpen /dev/sda2 root

cryptsetup luksOpen /dev/sda3 swap

cryptsetup luksOpen /dev/sda4 home
Make an ext4 filesystem inside and a swap space. Ext4 is the default, stable and more than just ‘good enough’ choice but you can use anything that plays well with Cryptsetup.
mkfs.ext4 /dev/mapper/root

mkfs.ext4 /dev/mapper/home

mkswap /dev/mapper/swap
Step 4 – Final Partitioning and Installation
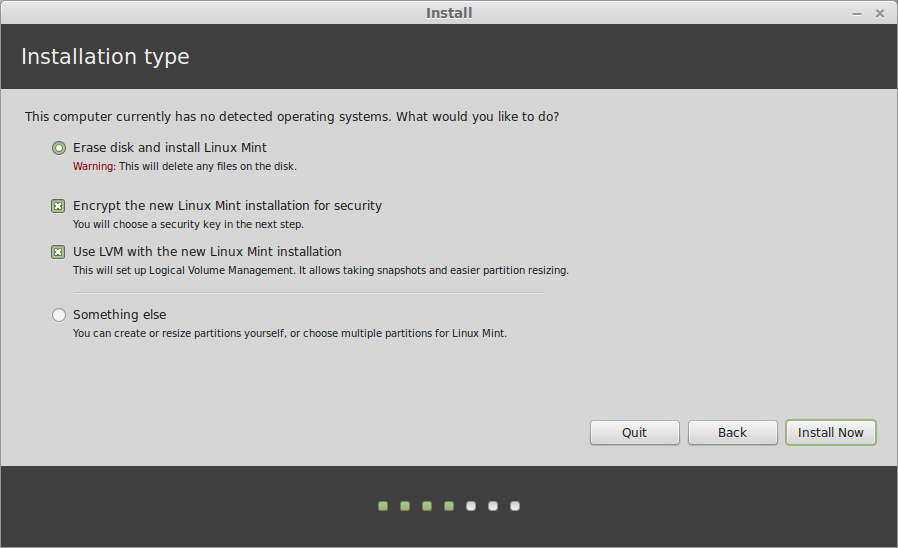
Now we can begin installing the operating system from the live session. Know that you don’t need to be connected to the internet for this though the installer could make you think otherwise. The installer’s first mention of partitioning is what you see in the screenshot below. Whether you have other operating systems on the drive or not, choose Something else, then Continue.
Step 5 – Don’t Leave the Live Session!
When the installer is finished, you’ll have the choice to reboot or continue testing. Choose Continue Testing. If you don’t, you won’t be able to boot the new system so you’ll need to go back into the live session and unlock the encrypted volumes before going further.
Step 6 – chroot Magic
Prepare to chroot into the newly installed system. You’ll need your root terminal back or sudo -i. Recall our system partition is /dev/sda2, known to Cryptsetup simply as root.
cd /mnt

mkdir root

mount /dev/mapper/root root

mount /dev/sda1 root/boot
Now do the actual changeroot and mount some needed filesystem points.
chroot root

mount -t proc proc /proc

mount -t sysfs sys /sys
Step 7 – Block Device & Filesystem Tables
crypttab
The crypttab file tells the system which block devices are your encrypted volumes but you don’t have one yet in your newly installed OS. To make one from your chrooted terminal:
nano /etc/crypttab
Then grab your encrypted devices’ identifiers (don’t use device names like /dev/sda2). Open a second terminal and:
sudo blkid
Find the UUIDs for root, home and swap. They will all say “crypto_luks” at the end and the one you want for swap will NOT be the one which just says “swap”. Highlight and copy & paste the UUIDs into crypttab in the chrooted terminal. (To paste text into nano, press Control+Shift+V.)
Your crypttab file should look something like below. Change the end of a partition’s entry to “luks,discard” if it’s on an SSD and make sure swap’s crypttab entry says “swap” at the end. This swap option means the mkswap command is run on each boot after the volume is opened so there’s no chance of anything in swap surviving a reboot. Press Control+X to exit nano, Y to confirm and then Enter to save the changes.

fstab
fstab tells the system which partitions to automatically mount on boot and with what filsystem attributes. The installer should have handled the the fstab entries correctly but we’ll just double check because a disagreement between fstab and crypttab means you can’t decrypt your partitions on bootup.
nano /etc/fstab
Your fstab should look something like below. The /dev/mapper/* devices are the encrypted partitions and the only UUID will be for /boot, unless you have other unencrypted areas. Don’t tweak fstab with mount options or tmpfs entries now, just check it’s correct and leave it alone. When you’re sure everything looks good, press Control+X to exit.

Step 8 – Fix Hibernate and Update Init
Still in your chroot, we now want to set the resume target for coming out of hibernation. Take a look at:
nano /etc/initramfs-tools/conf.d/resume
You should see “RESUME=UUID=somelongdeviceidentifier” but that’s the UUID of the live session’s swap file. You don’t want that. You want your newly installed system to resume from your encrypted swap so change it to:
RESUME=/dev/mapper/swap
Now to finish everything off, generate a new boot filesystem image and exit the chroot.
update-initramfs -u

exit
Step 9 – LUKS Header Backup
Having a backup of your partitions’ LUKS headers is important. If a LUKS key slot or the header itself becomes damaged and you don’t have a good copy to restore to the encrypted partition, the partition becomes unusable.
You shouldn’t be in the chroot anymore by now but you’ll still have a root terminal. Back up the LUKS headers for each of your encrypted partitions. The command below puts a header image in root’s home folder and will be owned by root. Leave it that way and move it to external non-networked storage. When you’ve created the images, exit the root terminal.
Do not skip this!
cryptsetup luksHeaderBackup /dev/sdxy --header-backup-file /root/partition_name.img

exit
That’s it! Now reboot into your new fully encrypted Linux system. If all went well, one of three things will happen:
- If you’re on a distro which does not use full systemd (such as Debian Wheezy and Ubuntu 14.04), you’ll be asked for three passphrases: one for each partition you encrypted.
- If you do have systemd (Jessie, 15.04, CentOS 7…) and /home is using the same passphrase as /, then /home will be decrypted automatically after you enter the system partition’s passphrase.
- With systemd and different passphrases for all your partitions, you’ll need to enter each manually.
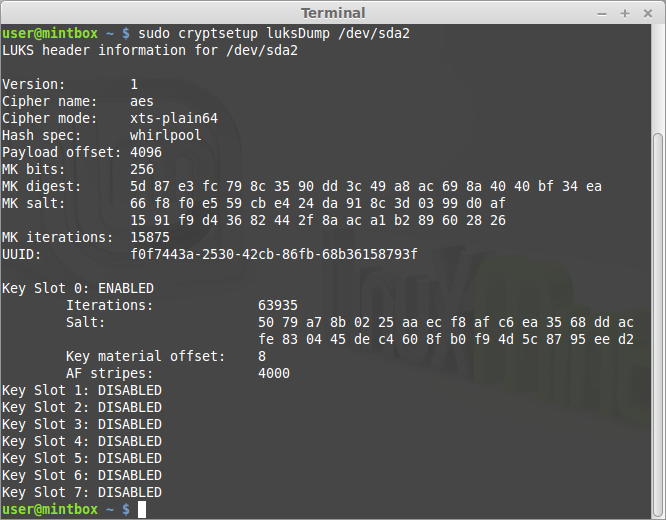
Once booted, you can see the results of your hard work.
sudo cryptsetup luksDump /dev/sdxy
You should see something like this:
Extras
Home key file
You can use a key file to automatically decrypt /home on boot. If you fit into the second option above where systemd decrypts /home for you, you don’t need this. Otherwise, this will save you from /home’s password when starting up. You’re not sacrificing security because the key file will be stored on the encrypted system partition, owned and viewable by only the root user. Or you could put the key file on any other internal or external media, like a USB stick which also has your /boot partition. You can do this from your normal user session in the encrypted system.
Create an 8.2 MB key file, the maximum size cryptsetup supports.
sudo -i

dd if=/dev/urandom of=/root/homekey bs=8192KB count=1
Change its permissions.
chmod 0400 /root/homekey
Add to crypttab.
home UUID=... /root/homekey luks
Add to Home’s LUKS header.
cryptsetup luksAddKey /dev/sdxy /root/homekey
Update init.
update-initramfs -u
Confirm.
cryptsetup luksDump /dev/sdxy

exit
Multi-booting
If you want to dual boot your encrypted Linux of choice with Windows, first install Windows and then you can begin from Step 2 of this page. There are no changes you’d need to make.
If you want to dual boot multiple encrypted Linux distros to be entirely independent of each other, you would create boot, system and home partitions just like is done above, but for each installation (so you would have multiple boot partitions). Since swap space is recreated each time the OS boots, your distros can share the same swap partition unless you want the ability to hibernate distro 1, but then boot into distro 2. If so, then just make a swap for each distro.
Install the first distro’s bootloader to the drive’s MBR or GPT area, and the remaining distros’ bootloaders to their /boot partitions. Rebooting into the first distro and running os-prober manually with sudo os-prober should give you all your distros in GRUB for succeeding reboots. If os-prober finds anything, you’ll see this in the terminal. If it doesn’t, you may need to manually add GRUB menu entries for the additional distros to /etc/grub.d/40_custom.
I’ve not done this myself so I can’t give much further advice on it. If you’re having trouble getting multiple Linux installations to show in GRUB, Ubuntu’s setup documentation and the Arch Wiki’s GRUB page may be helpful.
Swap file
If you do want a swap area but don’t use hibernate, you can use a swap file. You can put it anywhere but you want to make sure it’s not on an unencrypted partition. Without hibernate, you’ll be suspending to RAM. That’s fine, but know that your LUKS key is stored in RAM unencrypted when the computer is sleeping.
In the installed system, first make a swap container. N is the size you want in gigabytes and if you’ve got 4GB or more of memory and you’re not working on a server, then a minimum swap size of half your system’s RAM is realistically sufficient. Below 4GB, a swap size of 75 to 100 percent of the RAM available is good.
sudo fallocate -l NG /swapfile
Then make the actual swap filesystem and restrict its permissions so that only the root user can read and write to it.
sudo mkswap /swapfile

sudo chmod 0600 /swapfile
Add it to fstab.
/swapfile none swap sw 0 0
And last, switch it on. No reboot necessary.
sudo swapon /swapfile
Swap Location and Performance
See the Arch Linux Wiki’s Swap page for this.
Issues & Troubleshooting
Won’t boot
If all did not go well, you’ll likely experience one of two things. You’ll have the choice to skip mounting or enter manual recovery, or you won’t even be able to boot that far. If an encrypted volume won’t mount on boot, it’s probably the wrong UUID in crypttab or something wrong in fstab. The easiest way to fix that would be to go back into a live session and make sure they agree.
If you can only boot to a black screen, maybe with a cursor at the top left, then either init’s ramdisk is unhappy or you’re seeing this issue with Plymouth on kernel 3.19. The easiest way around the Plymouth thing is to press Esc twice at the blank screen to get it back. See here for more permanent solutions by editing GRUB. If Plymouth isn’t the problem then it’s probably an initrd issue. You’ll want to get back into a live session and check in (real) GParted for a boot flag on the boot partition. Then chroot into the installed system again. Run mkinitrd, then update-initramfs -u. Reboot.
Worst case scenario: you must start over from Step 2 but that should not happen. Just be mindful of what you’re doing; take it slowly and you’ll be fine.
Hibernation
The general rule for hibernation is that if it works on an unencrypted system, it will work on an encrypted system too, even though the software can be uncooperative at times. Changing the RESUME= line as you did in Step 8 should be all that’s necessary but if you get stuck on this, here are some other guides which may prove useful:
- Ubuntu Community Wiki: Enable Hibernate With Encrypted Swap and its discussion thread on Ubuntuforums.
- Ubuntu Community Wiki: Power Management/Hibernate
- Arch Linux Wiki: Suspend and Hibernate
- Feeding the Cloud, Encrypted swap partition on Debian/Ubuntu.
If you find yourself in a situation where hibernate stops working after a kernel update, then you either need to reboot into the new kernel (preferred) or run update-initramfs -u -k all so that an initramfs is again created for the kernel you’re already using, and any other kernel you may have installed you might want to boot into.
crypttab option
Some guides mention adding encryption options to crypttab for swap, similar to what’s below. The intention is to re-encrypt swap’s partition on each boot with a key seeded by urandom. However, to quote the crypttab manual (man crypttab), these options are “ignored for LUKS devices.” Also see where it says LUKS needs a persistent key. The point is: don’t add these options unless you’re using plain dm_crypt.
   No!
swap	UUID=....	/dev/urandom	cipher=aes-xts-plain64:sha512
   No!